Get ready to elevate your party snacks with loaded nacho cheese tater tots! This fun and easy treat combines crispy tater tots with gooey nacho cheese, fresh veggies, and savory spices. Whether you’re hosting a game night or having friends over, these bites will steal the show. Let’s dive into this cheesy delight and make your next get-together unforgettable. Trust me, your taste buds will thank you!
Why I Love This Recipe
- Easy to Prepare: This recipe is quick and requires minimal effort, making it perfect for a weeknight snack or party appetizer.
- Customizable Toppings: Feel free to add your favorite toppings like guacamole or salsa to make it even more delicious.
- Crispy and Cheesy: The combination of crispy tater tots and gooey cheese is simply irresistible.
- Great for Sharing: Loaded nacho cheese tater tots are perfect for gatherings, allowing everyone to dig in and enjoy together.
Ingredients
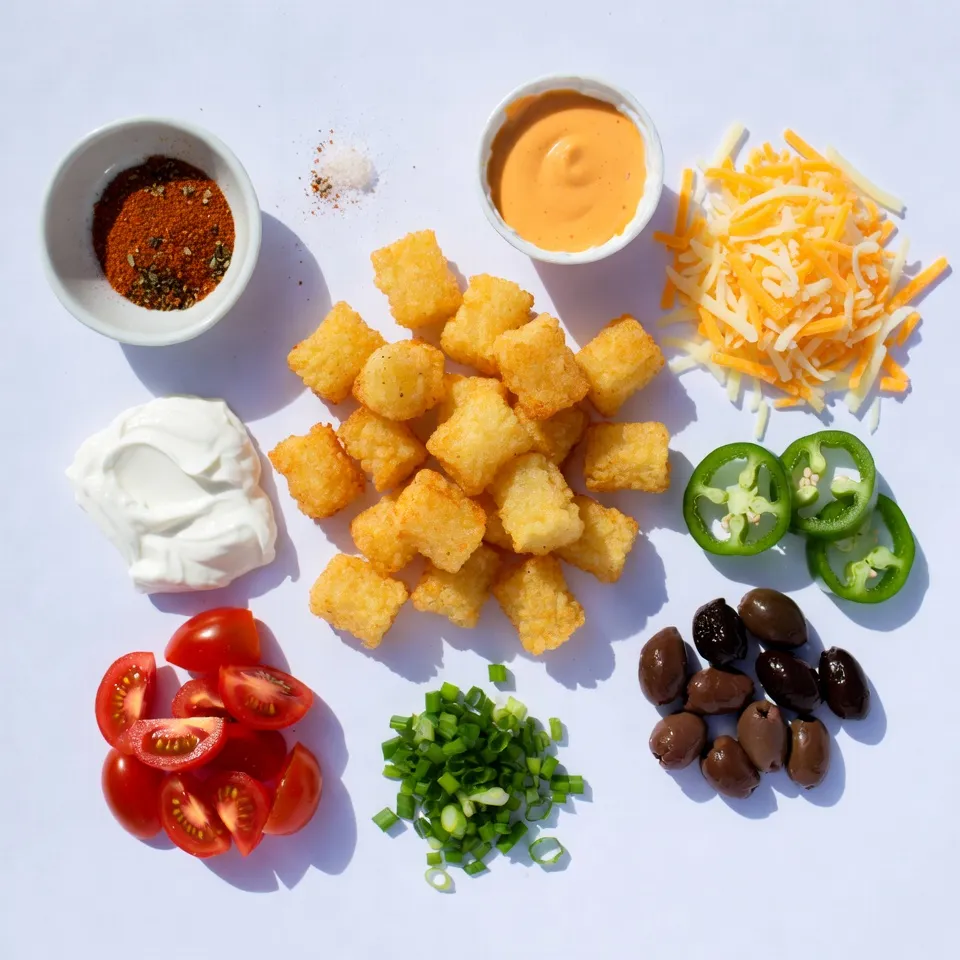
To make Loaded Nacho Cheese Tater Tots, you need these tasty items:
– 1 lb frozen tater tots
– 1 cup nacho cheese sauce
– 1 cup shredded cheddar cheese
– 1 jalapeño, sliced
– 1/2 cup black olives, sliced
– 1/2 cup cherry tomatoes, diced
– 1/4 cup green onions, chopped
– 1/4 cup sour cream
– 1 teaspoon taco seasoning
– Salt and pepper to taste
These ingredients come together to create a fun and flavorful dish. The crispy tater tots serve as the perfect base. The nacho cheese adds a creamy layer. Then, the cheddar cheese melts on top, making it gooey and rich.
Next, the sliced jalapeños give a kick. Black olives add a salty touch, while cherry tomatoes offer freshness. The green onions bring a nice crunch and color. Finally, the sour cream and taco seasoning add a creamy finish and extra flavor.
Gather these ingredients to make your party treat a hit!
Step-by-Step Instructions
Preparing the Tater Tots
Preheating the Oven:
Start by preheating your oven to 425°F (220°C). This step helps the tater tots cook evenly and get crispy.
Spreading Tater Tots on Baking Sheet:
Next, spread 1 pound of frozen tater tots on a baking sheet lined with parchment paper. Make sure they are in a single layer. This keeps them from sticking together and helps them crisp up nicely.
Assembling the Loaded Nachos
Drizzling Nacho Cheese Sauce:
Once the tater tots are golden brown after about 25-30 minutes, take them out of the oven. Drizzle 1 cup of nacho cheese sauce evenly over the crispy tots. Cover them generously so every bite is cheesy.
Adding Shredded Cheese and Toppings:
Now, sprinkle 1 cup of shredded cheddar cheese over the nacho cheese. Then, add your favorite toppings. Use sliced jalapeños, black olives, and diced cherry tomatoes for color and flavor.
Final Baking
Additional Baking Time:
Put the loaded tater tots back in the oven for another 5-7 minutes. This step melts the cheese and brings all the flavors together.
Cooling and Serving Suggestions:
Once they are done, take them out and let them cool for a few minutes. Drizzle 1/4 cup of sour cream on top. Sprinkle taco seasoning, salt, pepper, and chopped green onions for extra taste. Serve them in a large dish for a fun party treat!
Tips & Tricks
Achieving the Perfect Crispiness
– Baking Tips for Optimal Texture: For the best crispiness, bake tater tots at 425°F (220°C). Spread them out on the baking sheet. Avoid crowding them. This allows hot air to circulate. Bake for 25 to 30 minutes until golden brown. Flip them halfway for even cooking.
– Alternative Cooking Methods: You can also fry tater tots in oil for a crunchier texture. Air fryers are great too. They can give you that perfect crispy finish with less oil.
Customizing the Recipe
– Spice Levels with Jalapeños: Add jalapeños for a kick. You can slice them thin or leave them whole for more heat. If you prefer milder nachos, use less or skip them.
– Cheese Variations and Alternatives: While cheddar is classic, try other cheeses. Pepper jack adds spice. Gouda gives a rich flavor. You can mix cheeses for a unique taste.
Presentation Tips
– Garnishing for Visual Appeal: Make your dish pop! Add extra green onions on top for color. A dollop of sour cream in the center looks great.
– Serving Suggestions with Dips: Serve with salsa, guacamole, or extra sour cream on the side. This adds fun for dipping. Guests will love the variety!
Pro Tips
- Preheat for Perfection: Always preheat your oven to ensure even cooking and crispy tater tots.
- Cheese Choices: Experiment with different types of cheese, such as Monterey Jack or pepper jack, for a unique flavor twist.
- Spice it Up: Add more heat by including diced jalapeños or a sprinkle of cayenne pepper in the cheese sauce.
- Presentation Matters: Serve in a colorful dish and garnish with fresh herbs for an appetizing look that impresses.
Variations
Vegetarian Options
You can make my Loaded Nacho Cheese Tater Tots vegetarian. First, remove the jalapeños if you want less heat. Then, add other colorful veggies. Try bell peppers, corn, or zucchini for a fresh twist. These will keep your dish vibrant and tasty.
Protein Additions
Want to add protein? Ground beef or chicken works well. Cook the meat first, then layer it on top of the cheese. If you prefer, use shredded rotisserie chicken for a quick option.
You can also explore other meats. Crumbled chorizo adds a spicy kick, while pulled pork gives a sweet flavor. Each choice will give your tater tots a new taste.
Gluten-Free Adjustments
To make these Loaded Nacho Cheese Tater Tots gluten-free, check all your ingredients. Ensure the nacho cheese sauce and taco seasoning are gluten-free. Many brands offer safe options.
If you want to swap out the tater tots, try using sweet potato tots or cauliflower tots. These alternatives add a fun twist and keep the dish gluten-free.
Storage Info
Proper Storage Techniques
After enjoying your Loaded Nacho Cheese Tater Tots, it’s best to store leftovers properly. First, let the tater tots cool down to room temperature. Then, place them in an airtight container. You can store them in the fridge for up to three days.
For reheating, the oven works best. Preheat your oven to 350°F (175°C). Spread the tater tots on a baking sheet. Heat them for about 10-15 minutes until they’re warm and crispy again. Avoid using the microwave, as it can make them soggy.
Freezing Loaded Tater Tots
If you want to save some tater tots for later, freezing is a great option. First, let the loaded tater tots cool completely. Next, place them in a single layer on a baking sheet. Freeze them for about one hour. After they are firm, transfer them to a freezer-safe bag or container.
For the best flavor, use them within two months. When you’re ready to eat, take them out and let them thaw in the fridge overnight. After thawing, you can reheat them in the oven like before. This will help keep them crispy and tasty.
FAQs
Can I use fresh tater tots?
Yes, you can use fresh tater tots. They have a different texture than frozen ones. Fresh tater tots can be softer and may not get as crispy. Frozen tater tots are pre-cooked, so they crisp up better in the oven. Both options taste great, but frozen gives that classic crunch.
What can I use instead of nacho cheese sauce?
You can use different cheese sauces if you like. Cheddar cheese sauce works well and adds a nice flavor. You can also make your own by melting cheddar cheese with a bit of milk. Some people like to mix cream cheese for a richer taste. Feel free to experiment with different cheese blends!
How do I reheat leftovers?
Reheating is easy. Use an oven to keep the crunch. Preheat the oven to 350°F (175°C). Place the loaded tater tots on a baking sheet. Heat for about 10-15 minutes. This way, they stay crispy. You can also use a microwave, but they may get soft.
Are Loaded Nacho Cheese Tater Tots gluten-free?
Many ingredients can be gluten-free. Check the tater tots package for gluten-free labels. Nacho cheese sauce can contain gluten, so read the label too. Use gluten-free sauces to ensure your dish is safe. Always double-check to keep everyone happy and healthy!
You can make tasty Loaded Nacho Cheese Tater Tots with just a few simple steps. We covered the needed ingredients, preparation, and baking techniques to get the perfect dish. Plus, I shared tips for crispiness and customizations to suit your taste. Remember, you can store leftovers with ease and enjoy them later. This recipe makes for a fun snack or a meal. Get creative with variations and impress your friends or family with delicious results. Enjoy your cooking journe