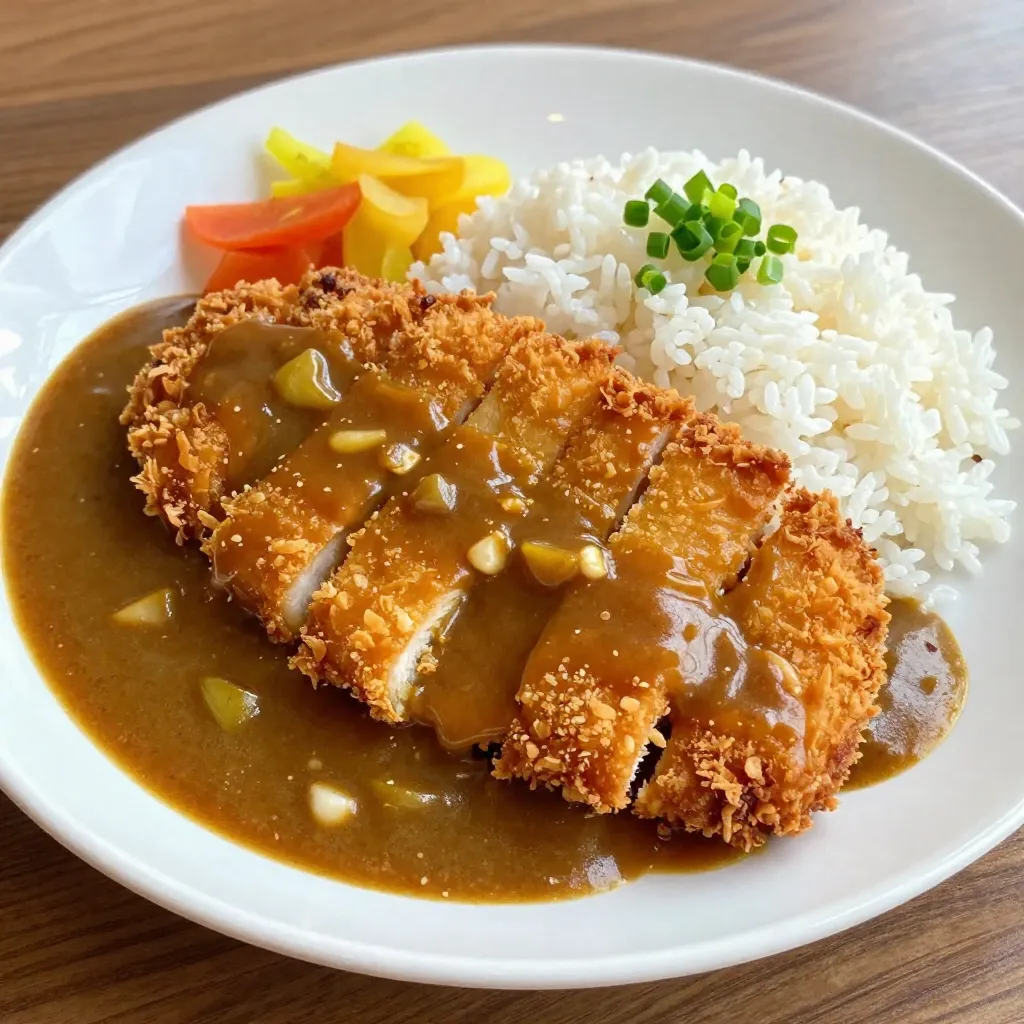
Ready for a tasty treat that will wow your taste buds? My Crispy Chicken Katsu with Curry Sauce Delight is a simple dish you can whip up at home. With crunchy chicken and rich curry sauce, it’s a hit for everyone. I’ll guide you through each step, from prepping your chicken to making the perfect sauce. Let’s dive into crafting this mouth-watering meal together!
Why I Love This Recipe
- Crispy Texture: The panko breadcrumbs give the chicken katsu an incredibly crispy and satisfying texture that contrasts beautifully with the tender chicken inside.
- Rich Flavor: The savory curry sauce, with its blend of spices and coconut milk, adds a rich and comforting flavor that elevates the dish to a whole new level.
- Quick and Easy: This recipe is straightforward and quick, making it perfect for a weeknight dinner that feels special without requiring hours of preparation.
- Versatile Dish: Serve it with rice, noodles, or even in a sandwich; this chicken katsu with curry sauce can be enjoyed in many delightful ways!
Ingredients
Main Ingredients
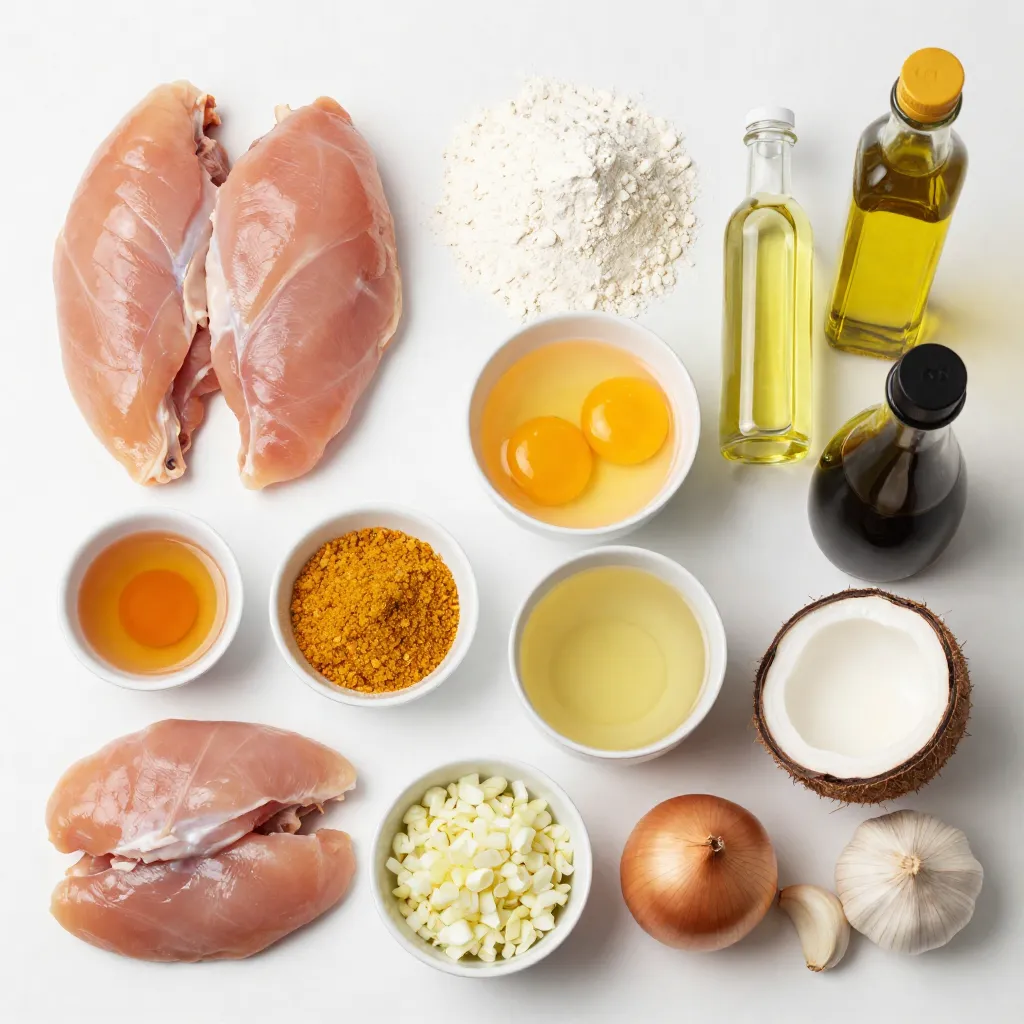
– 2 boneless, skinless chicken breasts
– Salt and pepper to taste
– 1 cup all-purpose flour
– 2 large eggs, beaten
– 2 cups panko bread crumbs
– Vegetable oil, for frying
– 1 tablespoon sesame oil
– 2 tablespoons curry powder
– 1 tablespoon soy sauce
– 1 cup chicken broth
– 1 tablespoon honey
– 1/2 cup coconut milk
– 1/2 onion, finely chopped
– 2 cloves garlic, minced
The main ingredients are simple yet essential. The chicken breasts form the heart of this dish. They should be fresh and of good quality. The salt and pepper will enhance the chicken’s natural flavor.
The breading components create that delightful crunch. Panko bread crumbs are a must. They give the chicken a light, crispy texture. The flour and eggs help the panko stick well.
Now, let’s talk about the curry sauce. The sesame oil adds a nice depth. Curry powder brings warmth and spice. The chicken broth makes the sauce rich. Honey balances the flavors, while coconut milk adds creaminess. Onions and garlic lend aroma and zest to the mix. Together, these ingredients create a mouthwatering dish.
Step-by-Step Instructions
Preparation of Chicken
How to pound and season chicken
Start by placing the chicken breasts between two sheets of plastic wrap. Use a flat side of a meat mallet to pound the chicken. Aim for an even thickness of about 1/2 inch. This helps the chicken cook evenly. Once you finish pounding, season both sides with salt and pepper.
Setting up the breading stations
Next, set up your breading stations. Use three shallow dishes. Put flour in the first dish, beaten eggs in the second, and panko bread crumbs in the third. This setup makes breading easy and organized.
Breading process for chicken
Now, it’s time to bread the chicken. Take each chicken breast and dredge it in flour. Shake off the extra flour. Next, dip it into the beaten eggs, letting any excess drip off. Finally, coat the chicken with panko breadcrumbs. Press the crumbs on to ensure they stick well.
Cooking Chicken Katsu
Heating oil and frying techniques
In a large skillet, heat vegetable oil over medium-high heat. You want enough oil to cover the bottom, about 1/4 inch deep. Wait until the oil is hot. You can test it by dropping a few crumbs in. If they sizzle, you’re ready.
Proper cooking time for crispy texture
Fry the breaded chicken in the hot oil. Cook for about 3-4 minutes on each side. You want the chicken to turn golden brown and crispy. Keep an eye on it to avoid burning.
Draining excess oil methods
Once cooked, transfer the chicken to a plate lined with paper towels. This helps drain the excess oil. Let it sit for a minute to cool slightly.
Making the Curry Sauce
Sautéing onions and garlic
In a separate saucepan, heat sesame oil over medium heat. Add the finely chopped onion. Sauté until the onion turns translucent, which takes about 3-4 minutes. Then, add the minced garlic and cook for an additional minute.
Adding spices and combining liquids
Stir in curry powder and cook for about 30 seconds. This brings out its flavor. After that, gradually add chicken broth, soy sauce, honey, and coconut milk. Stir well to combine everything.
Simmering for sauce consistency
Bring the mixture to a simmer. Let it cook for about 5-7 minutes. Stir occasionally until the sauce thickens slightly. Adjust the consistency as needed by simmering longer or adding a bit more broth.
Tips & Tricks
Achieving Perfect Crispy Chicken
– Temperature control for frying: Heat your oil to medium-high. If the oil is too cool, your chicken will soak up the oil and become greasy. A good test is to drop in a piece of bread; if it sizzles, the oil is ready.
– Importance of panko breadcrumbs: Panko is key for that crunch. It creates a light, airy crust. Regular breadcrumbs will not give you the same crispiness. Make sure to use panko for the best results.
– Pressing crumbs for better adhesion: After coating the chicken, press the panko crumbs gently but firmly. This helps them stick and form a great crust when frying. Don’t skip this step!
Enhancing the Curry Sauce Flavor
– Optional spices to consider: Add a dash of cumin or paprika for extra warmth. A pinch of cayenne pepper can spice it up, too. Experiment with what you like!
– Substitutions for a richer taste: Swap chicken broth for vegetable broth if you want a lighter option. You can also use coconut cream instead of coconut milk for a creamier sauce.
– Thickening tips for the sauce: If your sauce is too thin, mix a little cornstarch with water. Stir it in slowly while the sauce simmers until it reaches your desired thickness. This will help it cling better to the chicken!
Pro Tips
- Even Thickness: Make sure to pound the chicken breasts to an even thickness for consistent cooking and to prevent any dry spots.
- Press the Panko: After coating the chicken with panko breadcrumbs, press down firmly to ensure the crumbs stick well and create a crispy texture.
- Oil Temperature: Ensure the oil is hot enough before frying; if it’s too cool, the chicken will absorb too much oil and become greasy.
- Thickening Sauce: If you prefer a thicker curry sauce, you can mix a teaspoon of cornstarch with water and stir it into the sauce as it simmers.
Variations
Chicken Katsu Alternatives
You can swap out the chicken for other proteins. Pork is a great choice. It has a similar flavor and texture. Tofu is a fantastic option for a vegetarian twist. Just press it to remove excess water. This helps it absorb flavors and stay crispy when cooked.
If you need a gluten-free option for breading, use rice flour. You can also use crushed gluten-free crackers. They work well in place of panko bread crumbs. This keeps the crunch while making it safe for those with gluten allergies.
Sauce Variations
Let’s talk about curry sauce. Different curry powders can change the taste. You might try a mild curry powder for a gentle flavor. Hot curry powder gives a nice kick if you like heat. You can also use Japanese curry blocks for a sweeter taste.
To add more depth to your sauce, consider these extras. Try adding coconut flakes for texture. You can mix in chopped carrots for sweetness. Fresh herbs like cilantro can brighten the dish. A squeeze of lime juice adds a nice zing too.
Storage Info
Storing Leftovers
To keep your crispy chicken katsu fresh, use these tips:
– Refrigeration: Place leftover chicken katsu in a shallow airtight container. This helps reduce moisture. Store it in the fridge for up to three days.
– Freezing: For longer storage, wrap each chicken piece tightly in plastic wrap. Then, place in a freezer-safe bag. This way, the katsu can stay fresh for about three months. The curry sauce also freezes well. Just store it in a separate container.
Reheating Instructions
When you want to enjoy your leftovers, follow these steps for the best results:
– Maintaining Crispiness: Preheat your oven to 375°F (190°C). Place the chicken on a baking sheet. Bake for about 10-15 minutes. This helps keep the katsu crispy without frying it again.
– Reheating Sauce: Heat the curry sauce in a small saucepan over low heat. Stir it often to prevent sticking. If it thickens too much, add a splash of water to get the right consistency.
These simple tips will help you enjoy your crispy chicken katsu with curry sauce even after the first meal!
FAQs
What is Chicken Katsu?
Chicken katsu is a popular Japanese dish. It features breaded and fried chicken. The dish has roots in Western cuisine, which influenced Japanese cooking. Originally, katsu referred to meat cutlets like tonkatsu, made with pork. Today, chicken katsu is a favorite for its crispy texture and savory taste. You often serve it with rice and a side of shredded cabbage. Some enjoy it with a drizzle of tonkatsu sauce, while others prefer a rich curry sauce.
Can I prepare this recipe in advance?
Yes, you can meal prep chicken katsu. You can bread the chicken ahead of time. Place the breaded chicken in the fridge for a few hours. This lets the crust set and stay crispy when cooked. If you want to store it longer, freeze the breaded chicken. Just make sure to wrap it well to avoid freezer burn. You can also prepare the curry sauce in advance. Store it in an airtight container in the fridge. Reheat it on the stove when you’re ready to serve.
What sides pair well with Chicken Katsu?
Chicken katsu goes well with many sides. Steamed white rice is a classic choice. You can also serve it with a fresh salad or pickled vegetables for a crunch. A light cucumber salad adds a refreshing touch. For drinks, consider green tea or a light lager. These drinks complement the flavors well without overpowering them. You can also try a simple lemonade for a sweet and sour balance.
This blog post guides you through making Chicken Katsu with a rich curry sauce. You learned about key ingredients, step-by-step cooking methods, and helpful tips for perfect results. You can even try different proteins or sauce variations. With the right storage and reheating techniques, you’ll enjoy this dish later. Remember, practice makes perfect. Enjoy your cooking adventure as you create a tasty meal that will please everyon